
STEP 3: Utilities Hookup (1 hour)
When you purchased your lot, you were told - be sure you were - what utilities were available and how much they would cost. Now it’s time to make plans for a couple of months down the road with a few phone calls and/or a visit to each utility. Pay all fees and complete any necessary forms. Arrange for temporary electric service for your subs. Your electrician is responsible obtaining electrical permits and for installing the temporary electrical panel box and having it inspected, but you will have to apply for the service from the utility. This usually can be done over the phone.

Wells and septic systems, if used, can be installed now, and it is best to get this work done at this time. County or city health inspectors may be required by code to determine the location of these. Tell them your plans for such things as gardens or driveways, or which trees you hope to save, to guide them in their decisions. If no temporary source of water is available, such as a house next door, you will have to have the well dug and temporarily wired for your brick masons, who will be needed shortly, or they will have to truck in their own water.
I also recommend, and some locales require, a portable toilet on the job site. Sources for renting these can be found in the Yellow Pages under Toilets-Portable.
STEP 4: Footings (1 day)
The footing is the base of a structure. It is a mass of concrete supporting the foundation of the house. It can be poured into wooden forms or in trenches. It must be below the frost line, or it will heave when the ground thaws and freezes. In the northern states and higher elevations of any area, this line may be 4 or more feet below grade level. This is one reason there are more basements in a northern climate. If you have to be several feet below grade level for your footing, and thus need several feet of foundation to get back up to grade level, only excavation and a concrete slab are needed for a basement. Local codes will clearly state the requirements for footings in your area. The subcontractor you choose should know the code.
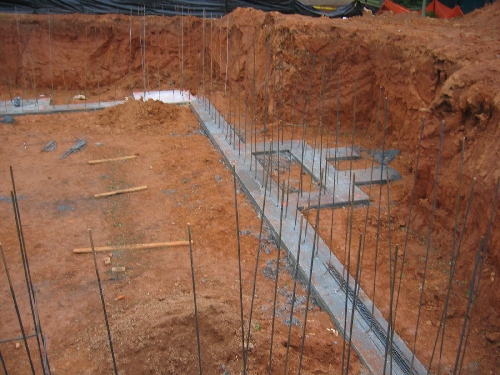
I have a footing sub that stakes, clears, excavates, digs, and pours footings. For your first house, I recommend that you find one who does the same. The cost will be comparable. The footing is probably the most important part of the house. If it settles or moves, so will your house. If it is not done according to the dimensions of your plans, you will have to change the plans to accommodate the footing or do the footing over. I recommend the former if the situation arises, unless the deviation is too severe.
After your foundation walls are up, put in a footing drain. Your code may require this. The drain can be connected to a dry well, storm sewer, or any other approved means of getting rid of the water. In some places, it can simply drain into your yard.
As a rule, footings are better today than they were 100 years ago. Well-built houses of today will probably last years longer than those built long ago. Technology has improved materials such as concrete, and our knowledge of how to use them has increased. I say this to help ease your mind about this important step.
Building inspectors usually check the locations of footings before they are poured to make certain they are deep enough and resting on undisturbed earth. Don’t complain about this inspection - it could save you thousands of dollars if it means that you will avoid some future problem.
Back to the “steps” overview page | next page | 1 2 3 4 5 6 7 8 9
